
Upgrading your electrical panel is a crucial investment in the safety and functionality of your Sacramento home. Modern households demand significantly more power than homes built just a few decades ago. When you decide to modernize your electrical system, understanding the timeline helps you plan effectively and minimizes disruption to your daily life.
This comprehensive guide breaks down the entire panel upgrade process from start to finish. We will explore the preparation phase, the physical installation timeline, and the final inspection requirements. You will learn exactly what to expect on installation day, which typically takes between four and twelve hours.
We will also detail the various factors that can extend this timeline. Whether you need a simple swap or a complex relocation involving utility companies, you will gain a clear understanding of the schedule. By the end of this guide, you will be fully prepared for your upcoming electrical project.
Understanding the Electrical Panel Upgrade Process
Your electrical panel functions as the core distribution center for your home’s power. Power flows from the utility grid into this main hub, which then directs electricity through individual circuits to your outlets, switches, and appliances. Over time, these panels become outdated, worn, or insufficient for modern energy needs.
An upgrade involves completely removing this old equipment and installing a modern, higher-capacity unit. This is not a simple cosmetic change. It requires careful planning, strict adherence to local building codes, and precision electrical work. Because the panel controls all power to your property, the upgrade process requires temporarily disconnecting your home from the utility grid.
Sacramento homeowners often pursue upgrades to support new appliances, electric vehicle chargers, or solar energy systems. Older neighborhoods frequently feature 60-amp or 100-amp panels that simply cannot handle today’s electrical loads. Upgrading to a 200-amp system ensures your home operates safely and efficiently. If you are experiencing constant tripped breakers or flickering lights, a professional electrical panel upgrade provides a permanent, reliable solution.
The Complete Timeline of an Electrical Panel Upgrade
Many homeowners mistakenly believe a panel upgrade only takes a few hours from start to finish. While the physical installation happens relatively quickly, the entire process actually spans several weeks. The timeline divides into four distinct phases: preparation, utility coordination, installation, and inspection.
Understanding these phases prevents frustration and helps you schedule the work at a convenient time. Let us look closely at each step of the journey.
Phase 1: Initial Consultation and Preparation (1 to 2 Weeks)
The process begins long before any tools touch your walls. The first step involves an onsite consultation with a licensed electrician. During this visit, the professional evaluates your current electrical load, inspects your existing panel, and discusses your future energy needs.
The electrician must calculate the precise electrical demand of your property to recommend the correct panel size. They will check the condition of your wiring, the location of the current panel, and the state of your service entrance cable. Following this assessment, you will receive a detailed proposal outlining the scope of work and the costs involved.
Once you approve the proposal, the preparation phase begins. The electrical contractor starts sourcing the necessary materials, which include the new panel box, breakers, grounding equipment, and specific wire gauges. Depending on supply chain availability, gathering these materials usually takes a few days.
Phase 2: Permitting and Utility Coordination (2 to 4 Weeks)
Electrical work of this magnitude requires strict oversight from local municipalities. Your contractor must submit detailed plans to your local building department to secure the necessary permits. In the Sacramento area, permit approval times vary based on the current workload of the city or county offices.
Simultaneously, the contractor must coordinate with your local utility provider, such as SMUD or PG&E. Because the main power lines must be disconnected before work begins, the utility company must schedule a technician to perform the shut-off. Aligning the schedules of the utility provider, the permitting office, and the electrical crew often represents the longest part of the timeline.
You do not need to manage this coordination yourself. A reputable contractor handles all permits and utility communications on your behalf. They will keep you informed of the assigned dates so you can prepare for the upcoming power outage.
Phase 3: The Day of the Upgrade (4 to 12 Hours)
The actual physical installation happens on a single day. On the scheduled morning, the utility company arrives to disconnect the power at the street or the pole. Once the power is safely cut, your electrical team begins the hands-on work.
For a straightforward panel swap in the exact same location, the work typically concludes within four to six hours. If the project involves moving the panel, replacing the service mast, or extensive rewiring, the timeline stretches to eight or twelve hours. We will explore the specific events of installation day in greater detail in the next section.
Regardless of the specific duration, you will be without power for this entire window. It is essential to plan accordingly by charging your devices, keeping refrigerators closed, and making alternative arrangements for sensitive work or medical equipment.
Phase 4: Final Inspections and Utility Reconnection (1 to 3 Days)
After the new panel is installed and tested by your electrician, it must pass a formal inspection. A municipal building inspector visits your home to ensure all work strictly complies with current electrical and fire codes. They will verify wire sizes, grounding systems, and breaker capacities.
In many jurisdictions, the utility company will not restore permanent power until the city inspector signs off on the permit. Some utility providers grant a temporary reconnection immediately after installation, pending the final inspection within a few days. Your contractor will explain the specific rules for your Sacramento neighborhood.
Once the inspector approves the work, the utility company officially locks the meter and finalizes the project. You now have a fully functional, modernized electrical system ready to handle your household demands safely.
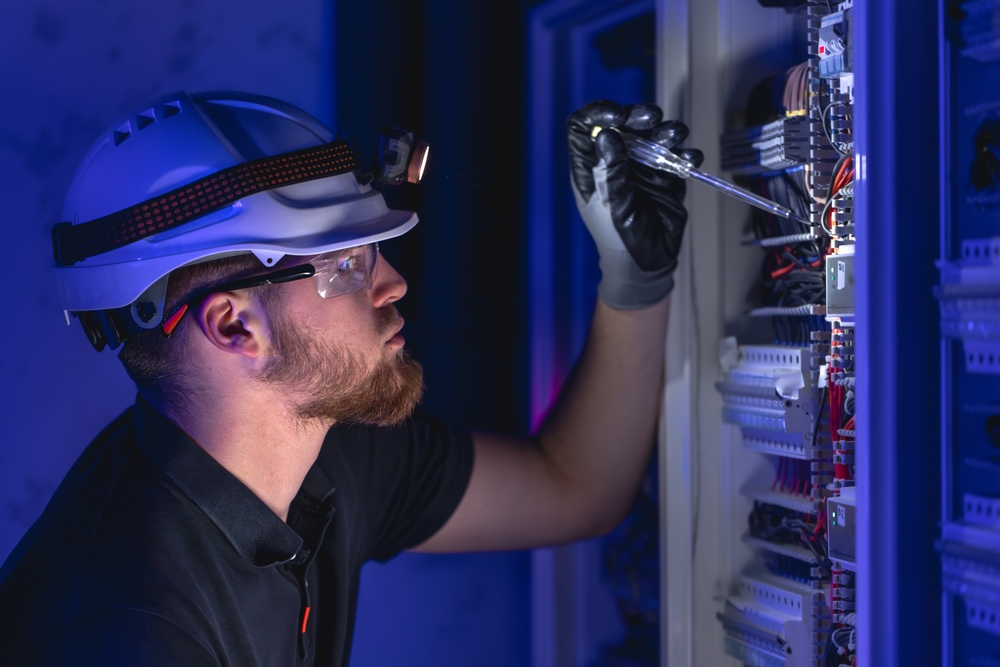
A Detailed Look at Installation Day
Installation day is the most critical part of the panel upgrade process. Knowing exactly how the technicians spend their time helps clarify why the job requires four to twelve hours. Professional electricians follow a strict, methodical procedure to ensure safety and quality at every step.
Arriving and Power Shut-Off
The day begins with a safety briefing and site preparation. The crew arrives with all required materials and sets up their workspace. Drop cloths are placed to protect your floors, and tools are staged for efficient access.
The first major milestone is the power disconnect. Depending on your setup, the utility company physically removes the meter or disconnects the service drop at the roofline. The lead electrician then uses specialized testing equipment to verify that zero voltage remains in the panel. Only after confirming the system is completely dead will the physical dismantling begin.
Removing the Old Equipment
Taking apart the old panel requires precision. The electrician carefully unscrews the cover and begins disconnecting every single wire from the old circuit breakers. They must carefully label each wire as they remove it to ensure it connects to the correct corresponding circuit in the new panel.
Once all branch circuits are disconnected, the heavy main service cables are removed. Finally, the technicians unbolt the old metal enclosure from the wall and remove it from the property. If the old panel was recessed into drywall, the crew takes care to minimize damage to the surrounding wall structure.
Installing the New Enclosure
With the wall clear, the team mounts the new electrical panel. Modern 200-amp panels are significantly larger than old 100-amp boxes. If the new panel goes into the same space, the technicians might need to cut away some drywall or modify the surrounding studs to accommodate the larger footprint.
The new enclosure must be mounted perfectly level and securely anchored to the structural framing. After mounting the box, the electrician feeds the main service cables into the panel and secures them to the main breaker. This creates the primary pathway for electricity to enter your home once power is restored.
Wiring and Circuit Breaker Replacement
Wiring the new panel represents the most time-consuming phase of the day. The electrician routes every labeled wire into the new box, ensuring neat, organized cable management. Proper wire routing prevents dangerous heat buildup and makes future maintenance significantly easier.
Next, the technician installs the new circuit breakers. Modern codes require Arc Fault Circuit Interrupters (AFCIs) and Ground Fault Circuit Interrupters (GFCIs) for many areas of the home. The electrician carefully strips the ends of the branch circuit wires and secures them to the appropriate breakers. If you need targeted repairs in other areas of your home, this is a great time to address circuit breaker replacement needs.
The grounding system is also completely updated during this phase. The crew drives new copper grounding rods deep into the earth outside your home and runs a heavy continuous bonding wire back to the new panel. A robust grounding system is absolutely vital for protecting your electronics and preventing electrical shocks.
Cleanup and Final Testing
Once all connections are torqued to factory specifications, the electrician performs a comprehensive visual inspection. They check for stray copper strands, verify that all neutral and ground wires are properly separated, and ensure the panel is perfectly clean inside.
When the utility company restores power, the testing phase begins. The electrician uses a multimeter to verify proper voltage at the main lugs. They then turn on each individual breaker one by one, checking that power flows correctly to every circuit in the house. Finally, the protective cover is attached, and the workspace is thoroughly cleaned.
Factors That Influence the Duration of Your Panel Upgrade
While a standard upgrade takes four to eight hours, several variables can push the timeline closer to the twelve-hour mark or even span two days. Every home presents unique challenges. Your electrical contractor will identify these factors during the initial consultation.
Relocating the Electrical Panel
Moving your panel to a new location significantly increases the project duration. Building codes mandate strict clearance rules around electrical panels. They cannot be located in clothes closets, bathrooms, or cramped spaces lacking proper headroom.
If your old panel violates current location codes, you must move it during the upgrade. Relocating a panel requires routing all existing circuit wires to the new location. This often involves running a large junction box in the old location and splicing new wire extensions to reach the new panel. Drilling new pathways through framing and running extensive conduit adds hours of labor to the process.
Upgrading the Service Mast and Weatherhead
For homes with overhead power lines, the electricity enters through a metal pipe on the roof called a service mast, capped by a weatherhead. The wires inside this pipe run directly to your meter and panel.
If you are upgrading from 100 amps to 200 amps, the existing wires inside the service mast are usually too small to carry the increased load. The electrician must completely rebuild the service entrance. This involves climbing onto the roof, removing the old mast, installing a larger conduit, pulling heavier gauge wire, and securing a new weatherhead. Rebuilding the overhead service easily adds two to three hours to the installation day.
Dealing with Outdated Wiring
When opening the walls around the panel, electricians occasionally uncover dangerous wiring situations. If your Sacramento home was built before the 1970s, you might have cloth-insulated wiring, aluminum branch wiring, or ungrounded circuits.
Connecting these outdated wires to a modern panel requires special handling and additional safety measures. In some cases, severely degraded wires near the panel must be replaced entirely to ensure safety. Addressing these hidden hazards extends the time required to complete the wiring phase securely. Providing comprehensive electrical services means we never ignore these critical safety issues during an installation.
Subpanel Installation Needs
Sometimes, a single main panel is not the best solution for a large property. If you are adding a major addition, building an accessory dwelling unit (ADU), or outfitting a detached garage workshop, you might need a secondary distribution point.
Installing a subpanel adds another layer of complexity to the upgrade. The electrician must mount the second box, run heavy feeder cables from the main panel to the subpanel, and wire the remote circuits. If your project includes asubpanel installation, expect the crew to be on-site for a full day or more.
Weather Conditions in Sacramento
Because an electrical panel upgrade requires outdoor work—especially involving the meter base, service mast, and grounding rods—weather plays a role in the timeline. While Sacramento generally enjoys mild weather, extreme heat during summer or heavy winter storms can slow down the process.
Electricians cannot safely work on live utility lines or roof structures during heavy rain or high winds. If severe weather strikes on your scheduled installation day, the outdoor portions of the project might face delays. Professional contractors prioritize safety and will communicate any weather-related schedule adjustments immediately.
Minimizing Disruption During Your Upgrade
Losing power for an entire day requires some logistical planning. By taking a few proactive steps, you can make the installation day much more manageable for your family.
Preparing Your Home for a Power Outage
First, focus on your food supply. Keep your refrigerator and freezer doors closed tightly during the installation. A modern, well-sealed refrigerator will keep food cold for about four hours without power, while a full freezer can hold its temperature for up to 48 hours. If you anticipate a longer installation, consider moving sensitive items to a cooler packed with ice.
Next, manage your climate control. If the upgrade occurs during a hot Sacramento summer, heavily air-condition your home the night before and the morning of the upgrade. Keep blinds and curtains closed to trap the cool air inside. Conversely, heat your home thoroughly if the upgrade takes place during the winter.
Finally, plan for your digital needs. Charge all laptops, smartphones, and power banks overnight. If you work from home, you will lose access to your Wi-Fi router. Plan to use a mobile hotspot or arrange to work from a local coffee shop while the crew completes the physical installation.
Communicating with Your Electrician
Clear communication ensures the day runs smoothly. Before the crew arrives, clear a wide path to the electrical panel. Remove any storage boxes, vehicles, or furniture that block access to the panel, the meter, or the attic access hatch. Electricians need plenty of space to maneuver large tools and heavy materials.
Inform the lead electrician about any specific concerns you have regarding the house. Let them know which circuits power critical equipment, such as medical devices or sump pumps. A professional team appreciates a prepared homeowner and will work efficiently to restore power to your most important circuits first if necessary.
Signs It Is Time to Schedule Your Panel Upgrade
Many homeowners wait until a catastrophic failure forces them to replace their panel. Being proactive saves you from emergency service fees and sudden, extended power outages. Pay attention to the subtle warning signs your electrical system provides.
Electrical Troubleshooting Indicators
Your electrical system constantly communicates its health. If you experience lights that dim when the air conditioner turns on, your system is struggling with the load. Frequent breaker trips are another major red flag. A breaker trips to protect your home from overheating wires; if it happens constantly, your panel lacks the necessary capacity.
You should also use your senses. If you hear buzzing or crackling sounds coming from the breaker box, arcing is occurring inside. If the panel feels warm to the touch, or if you smell a faint odor of burning plastic, call a professional immediately. These are severe fire hazards that require immediate electrical troubleshooting and likely a full panel replacement.
Adding Heavy-Draw Appliances
If you plan to modernize your home, you must prepare your electrical infrastructure first. Purchasing an electric vehicle requires a dedicated 240-volt circuit that draws massive amounts of power. Transitioning from gas to electric appliances, such as induction stoves or heat pump water heaters, drastically changes your energy consumption profile.
Before investing in major new appliances, have your panel evaluated. A 100-amp panel simply will not support an EV charger, a central AC unit, and an electric dryer running simultaneously. Upgrading your panel ahead of time ensures your new investments function flawlessly from day one.
Why You Need a Professional for Panel Upgrades
An electrical panel upgrade is never a do-it-yourself project. The risks associated with high-voltage electricity are simply too great. Hiring a licensed, bonded, and insured professional is the only way to ensure the job is done safely and legally.
Safety and Code Compliance
Working inside a main electrical panel exposes you to the full force of the utility grid. Even when the main breaker is turned off, the service cables entering the top of the box remain constantly energized. A single mistake can result in lethal shock or severe arc flash burns.
Licensed electricians undergo years of rigorous training to handle these dangers safely. They understand the complex requirements of the National Electrical Code (NEC) and the specific amendments enforced in Sacramento. Professional installation guarantees that your new panel features the correct wire sizing, adequate grounding, and appropriate breaker types to prevent electrical fires.
Efficient Timelines
Experience directly translates to efficiency. A master electrician has performed hundreds of panel upgrades. They anticipate challenges, carry the right tools, and work with a practiced rhythm. An amateur attempting this work will take days, leaving the home without power and exposing the family to massive safety risks.
Furthermore, utility companies and municipal inspectors only work with licensed contractors. You cannot legally pull the necessary permits or request a utility disconnect without a valid contractor’s license. Partnering with a professional ensures the complex coordination phase moves smoothly, preventing unnecessary delays in restoring your power.
Conclusion
Understanding how long a panel upgrade takes allows you to approach the project with confidence. While the preparation and permitting phases require a few weeks of patience, the actual installation day is highly efficient. In just four to twelve hours, a professional electrical team can completely transform the safety, capacity, and reliability of your home’s power distribution.
Factors like relocating the panel, rebuilding the service mast, or updating a subpanel can extend the timeline. However, clear communication with your contractor ensures you know exactly what to expect before the power is ever turned off. By preparing your home for a brief outage and trusting the process, the temporary inconvenience easily yields long-term peace of mind.
If your home struggles to keep up with modern electrical demands, do not wait for a complete system failure. A modern 200-amp panel protects your property from fire hazards, supports your newest appliances, and increases the overall value of your home. Take the first step toward a safer, more powerful home by scheduling a professional consultation today. Ensure your electrical system is fully equipped to handle whatever the future brings.
Our Services at a Glance
At TNT Electric, we are a licensed electrical company based in Citrus Heights, CA, proudly serving the Sacramento area with dependable, professional service.
View Services
